
As test engineers when we approach performance testing we usually only think about final end-to-end application verification with tools such as JMeter, Locust or Gatling. We know that such tests should run on a separate environment with conditions resembling production as close as possible. Unfortunately in some cases (especially with monolithic architecture) dedicated performance testing environment is hard to get. What to do in such cases? Should we test on common test environment? Or should we test on production? Or maybe we should change our approach to performance testing? Each option has advantages and disadvantages.
Today I'd like to describe low-level performance testing (often called benchmarking) of Java code. It does not require a separate environment. It can be executed directly from your IDE (although that's not recommended) or from the command line. Measuring the performance of critical pieces of code is essential for everyone who creates applications, frameworks, and tools. Testers are co-creators so it's also our responsibility.
Is it easy?
Benchmarking correctly is hard. There are multiple optimizations implemented on the JVM/OS/hardware side which make it challenging. In order to measure right, you need to understand how to avoid those optimizations because they may not happen in the real production system.
Thankfully, there is a tool which helps you mitigate those issues called JMH (Java Microbenchmark Harness). It was created for building, running, and analyzing nano/micro/milli/macro benchmarks written in Java and other languages targetting the JVM. The tool is developed by OpenJDK.
Common pitfalls
JMH tool does not guarantee that your benchmark is implemented correctly. You still need to avoid common pitfalls. According to tool creators, the best way to learn how to use JMH is to read through the official JMH samples before implementing your own benchmarks.
I'll describe only the four most common pitfalls. For a more complete list please refer to other sources(see the further reading section at the bottom).
a) Dead code elimination
JVM is smart enough to detect that certain code is never used. That's why the methods you measure should always return something. Alternatively, you can use JMH consume method which guarantees that consumed code will never be buried by JVM.
    @Benchmark
   public void test(Blackhole blackhole) {
        int a = 2;
        int b = 1;
        int sum = a - b;
        blackhole.consume(sum);
    }
b) Constant folding
If JVM realizes the result of the computation is the same no matter what, it can cleverly optimize it. That's why you should act against your IDE suggestion and don't make any fields final.
    private double x = Math.PI;
    private final double wrongX = Math.PI;

    @Benchmark
    public double wrong() {
        return Math.log(wrongX);
    }

    @Benchmark
    public double right() {
        return Math.log(x);
    }
c) Loop optimizations
You need to be very careful benchmarking unit operations within loops and dividing measurements by the number of iterations. JVM optimizes the loop, so the cost of the loop is smaller than the sum of the costs of its parts measured in isolation.
It's a bit tricky (I have misunderstood how it works at first) so I suggest to take a closer look at JMH example 11 and 34.
d) Warmup
From official JMH playground GitHub repository:
- You need warmup iterations because of JVM and JIT warmup. How many depends on the benchmark, but probably no less than 5. A safer number is 10.
- The more measurement iterations you use, the smaller the error margin reported by JMH at the end! A solid choice is 20 iterations.
Setup
JMH is very easy to start working with. You can create your own project in a couple of seconds. Just execute the following command in your ~/IdeaProjects folder and open first-benchmark project.
mvn archetype:generate -DinteractiveMode=false -DarchetypeGroupId=org.openjdk.jmh -DarchetypeArtifactId=jmh-java-benchmark-archetype -DgroupId=com.awesome.testing -DartifactId=first-benchmark -Dversion=1.21
Alternatively, if you want to create tests in existing project, you can follow the same steps I did for my AwesomeTesting Github repository. First, add maven dependencies. In a real-world scenario you probably also need to add your application here(in order to call methods you want to measure).
        <dependency>
            <groupId>org.openjdk.jmh</groupId>
            <artifactId>jmh-core</artifactId>
            <version>1.21</version>
        </dependency>
        <dependency>
            <groupId>org.openjdk.jmh</groupId>
            <artifactId>jmh-generator-annprocess</artifactId>
            <version>1.21</version>
        </dependency>
After that you need to configure maven-shade-plugin which will be responsible for creating an executable jar.
            <plugin>
                <groupId>org.apache.maven.plugins</groupId>
                <artifactId>maven-shade-plugin</artifactId>
                <version>3.2.1</version>
                <executions>
                    <execution>
                        <goals>
                            <goal>shade</goal>
                        </goals>
                        <configuration>
                            <finalName>benchmarks</finalName>
                            <transformers>
                                <transformer
                                        implementation="org.apache.maven.plugins.shade.resource.ManifestResourceTransformer">
                                    <manifestEntries>
                                        <Main-Class>org.openjdk.jmh.Main</Main-Class>
                                        <X-Compile-Source-JDK>1.8</X-Compile-Source-JDK>
                                        <X-Compile-Target-JDK>1.8</X-Compile-Target-JDK>
                                    </manifestEntries>
                                </transformer>
                            </transformers>
                            <filters>
                                <filter>
                                    <artifact>*:*</artifact>
                                    <excludes>
                                        <exclude>META-INF/*.SF</exclude>
                                        <exclude>META-INF/*.DSA</exclude>
                                        <exclude>META-INF/*.RSA</exclude>
                                    </excludes>
                                </filter>
                            </filters>
                        </configuration>
                    </execution>
                </executions>
            </plugin>
Now create your jar:
mvn clean package -DskipTests=true
And execute benchmarks (provide the class name which contains @Benchmark annotated methods)
java -jar target/benchmarks.jar BenchMark
Configuration
There are three alternative ways of configuring JMH:
a) Annotations
You can use Java annotations which is very convenient. That's my favorite type by far because I can easily access nicely written Javadoc for each option. Here is how I configured my demo (each option would be described below):
@Fork(value = 3, warmups = 0)
@OutputTimeUnit(TimeUnit.MILLISECONDS)
@BenchmarkMode(Mode.AverageTime)
@Warmup(iterations = 5, time = 10)
@Measurement(iterations = 5, time = 10)
public class BenchMark {
b) Java API
If you prefer Java API you can use builder configuration and run your tests from IDE. That's not recommended because Benchmark should ideally run with every single application closed.
    public static void main(String[] args) throws RunnerException {
        Options opt = new OptionsBuilder()
                .include(BenchMark.class.getSimpleName())
                .warmupIterations(5)
                .measurementIterations(5)
                .forks(1)
                .build();

        new Runner(opt).run();
    }
c) Command line
Last but not least, you can the command line to override configuration. See help for more info:
java -jar target/benchmarks.jar BenchMark -h
Example: 5 warmup/measurement iterations, single fork
java -jar target/benchmarks.jar BenchMark -wi 5 -i 5 -f 1
Configuration options
JMH provides multiple configuration options which can be used in our benchmarks. You can find detailed descriptions in excellent JMH Javadoc.
a) BenchmarkMode
Defines the mode in which this benchmark will run.
- Throughput: measures the number of operations per time unit
- AverageTime: measures the average time it takes for the benchmark method to execute (timeunit/operation)
- SampleTime: samples the time for each operation (min, max, etc.)
- SingleShotTime:measures the time for a single operation.
- All: All modes
b) OutputTimeUnit
Defines a time-unit for results (nanoseconds, milliseconds, seconds, minutes, etfc.)
c) Fork
The fork allows setting the default forking parameters for the benchmark.
- value() defines how many times the benchmark will execute
- warmups() defines how many time the benchmark will execute ignoring results
Additionally, you can modify JVM options using this annotation.
d) Warmup
Warmup allows setting the default warmup parameters for the benchmark which will execute before each fork (including warmup forks).
- iterations() sets the number of iterations
- time() sets the time for each iteration
- batchSize() sets the number of benchmark method calls per operation
e) Measurement
Measurement allow setting the default measurement parameters for the actual benchmark. Parameters the same as @Warmup.
f) Threads
Threads provides the default number of threads to run. By default, this setting is set to 1. If you want to use maximum set value to Threads.MAX (the equivalent of Runtime.getRuntime().availableProcessors())
Predefining state
Unfortunately, two sections of this article aren't enough to fully describe the JMH configuration. One of the most challenging tasks when it comes to benchmarking is ensuring clean and not JVM-optimized state before each measurement.
Of course, JMH helps us in this domain as well with class-level @State annotation. This has to be nested public static class defined in a class which contains our Benchmark methods.
The Scope class gives us the following options:
- Thread: Each thread running the benchmark will create its own instance of the state object.
- Group: Each thread group running the benchmark will create its own instance of the state object.
- Benchmark: All threads running the benchmark share the same state object.
Having State class in place we can now use @Setup (the equivalent of Junit/TestNG Before) and @TearDown (Junit/TestNG After) which will execute before/after @Benchmark methods. The execution time of these methods will not be counted in our benchmark results.
Setup and Teardown can be set for three levels:
- Trial: before/after each fork
- Iteration: before/after each iteration
- Invocation: before/after measured method invocation. Javadoc for this option starts with WARNING: HERE BE DRAGONS! so unless you want to meet Game of Thrones dragons don't use it
In order to fully understand @Scope, you need to take a look into an actual example.
Let's suppose we want to measure multiplication in 4 scenarios (1*1, 1*31, 31*1, 31*31). We also want to start each fork with 0 as a result. After each iteration, we want to do garbage collection. Here is how our benchmark should look like:
public class ExplainingState {

    @State(Scope.Thread)
    public static class PredefinedState {

        @Param({"1", "31"})
        public int a;

        @Param({"1", "31"})
        public int b;

        @Setup(Level.Trial)
        public void doForkSetup() {
            multiplicationResult = 0;
            System.out.println("\n Do Setup before each fork \n");
        }

        @Setup(Level.Iteration)
        public void doIterationSetup() {
            System.out.println("\n Do Setup before each iteration \n");
        }

        @TearDown(Level.Iteration)
        public void doIterationTeardown() {
            System.out.println("\n Do teardown after each iteration \n");
            System.gc();
        }

        public int multiplicationResult ;
    }

    @BenchmarkMode(Mode.Throughput)
    @OutputTimeUnit(TimeUnit.MINUTES)
    @Fork(value = 1, warmups = 0)
    @Measurement(time = 1, iterations = 3)
    @Benchmark
    public void testMethod(PredefinedState predefinedState) {
        predefinedState.multiplicationResult = predefinedState.a * predefinedState.b;
    }
}
If you still don't understand please run the benchmark and analyze console output in order to see what's going on and when.
Demo
Uff... finally, demo time! After this long introduction, we can do something interesting. Let's say we want to measure how fast different implementations of methods summing 20000000 longs work. It's 1 + 2 + 3 +... + 20000000.
We have 5 contenders (full credit for problem definition goes to Modern Java in Action book which I can recommend).
a) iterativeSum()
    @Benchmark
    public long iterativeSum() {
        long result = 0;
        for (long i = 1L; i <= N; i++) {
            result += i;
        }
        return result;
    }
view raw
b) sequentialSum()
    @Benchmark
    public long sequentialSum() {
        return Stream.iterate(1L, i -> i + 1)
                .limit(N)
                .reduce(0L, Long::sum);
    }
c) parallelSum()
    @Benchmark
    public long parallelSum() {
        return Stream.iterate(1L, i -> i + 1)
                .parallel()
                .limit(N)
                .reduce(0L, Long::sum);
    }
d) rangedSum()
    @Benchmark
    public long rangedSum() {
        return LongStream.rangeClosed(1, N)
                .reduce(0L, Long::sum);
    }
e) parallelRangedSum()
    @Benchmark
    public long parallelRangedSum() {
        return LongStream.rangeClosed(1, N)
                .parallel()
                .reduce(0L, Long::sum);
    }
What do you think which implementation would be the best? We can theorize that implementations 2 and 3 would be slower because of autoboxing, but let's see!
Results
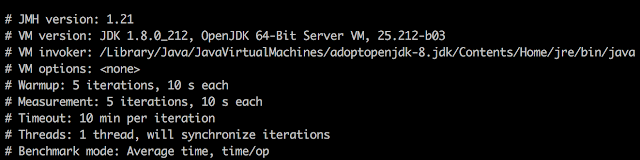
So here are result on my Mac with Intel(R) Core(TM) i7-4870HQ CPU @ 2.50GHz:
Setup:
Measurements:
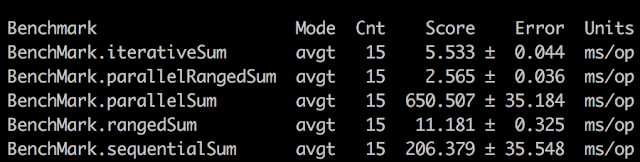
Verdict:paralledRangedSum() has won the contest :)
As a homework you can try to parametrise N and see if parallelRangedSum() is still the best.
Further reading
- Modern Java in Action
- https://www.baeldung.com/java-microbenchmark-harness
- https://github.com/Valloric/jmh-playground
- http://tutorials.jenkov.com/java-performance/jmh.html
- https://openjdk.java.net/projects/code-tools/jmh/
- https://www.oracle.com/technetwork/articles/java/architect-benchmarking-2266277.html
- https://shipilev.net
- https://shipilev.net/talks/jvmls-July2014-benchmarking.mp4
- https://www.youtube.com/watch?v=VaWgOCDBxYw
- https://shipilev.net/talks/j1-Oct2011-21682-benchmarking.pdf
- http://leogomes.github.io/assets/JMH_cheatsheet.pdf
Comments
Loading comments…