

I'm pretty sure everyone has heard about the test pyramid. Famous Google testing blog article suggests a 70/20/10 split: 70% unit tests, 20% integration tests, and 10% end-to-end (E2E) tests.
The question is, how does it map to Android native app testing? In my article, I'll familiarize you with multiple Android tools that may enhance your testing skills. To get the most of them it's important to understand where are they placed on the test pyramid.
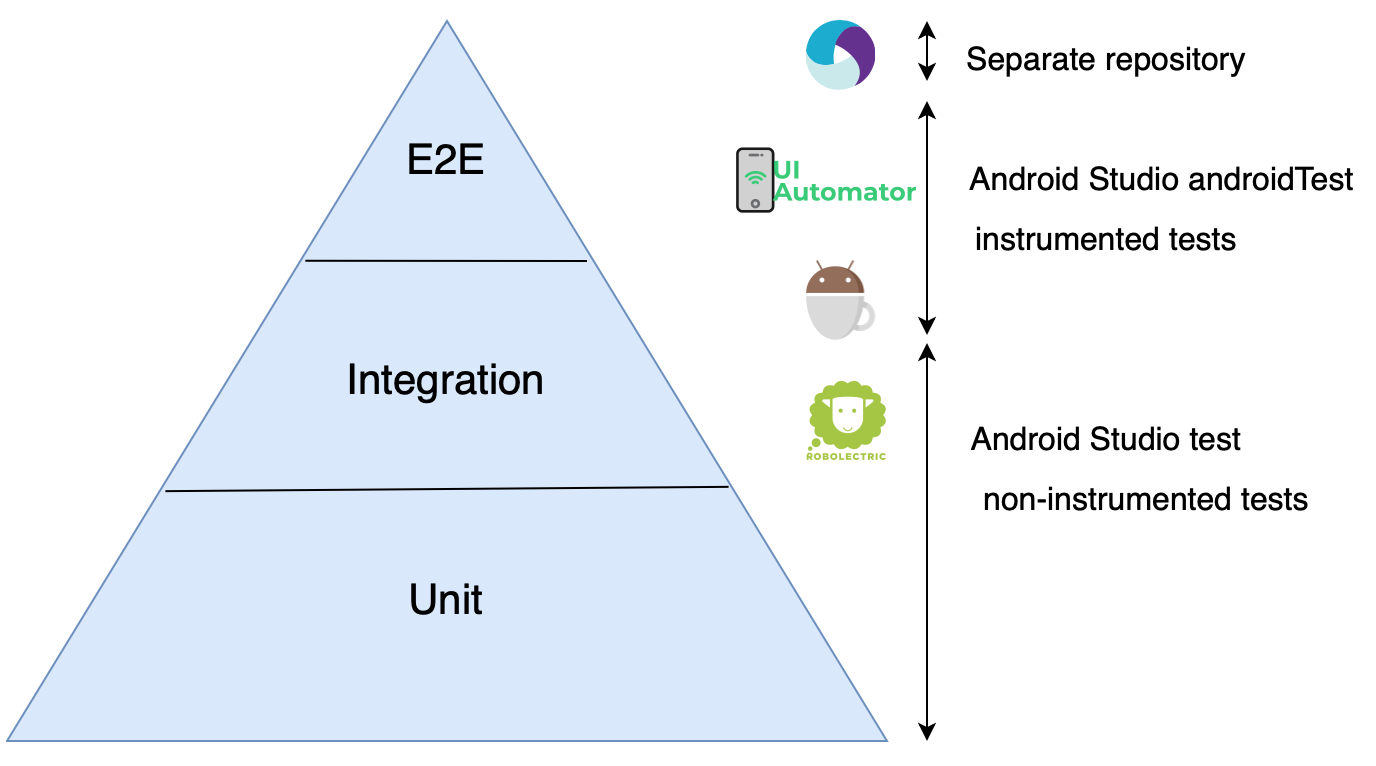
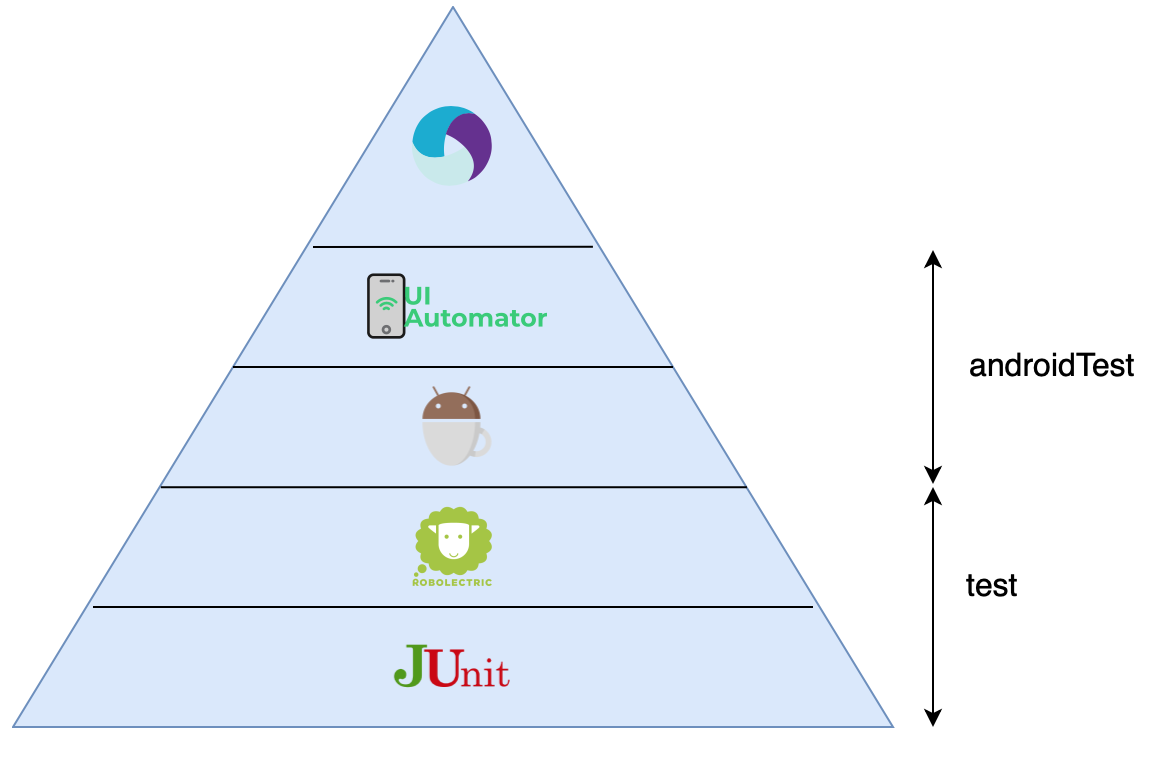
Android test pyramid
In a typical Android project, there are two places for tests:
- test package - non-instrumented tests requiring JVM only to run. This folder contains standard JUnit unit tests and Roboelectric scenarios using Android simulator underneath
- androidTest package - instrumented tests which require both JVM and physical or emulated device. This folder contains Espresso and UI Automator tests
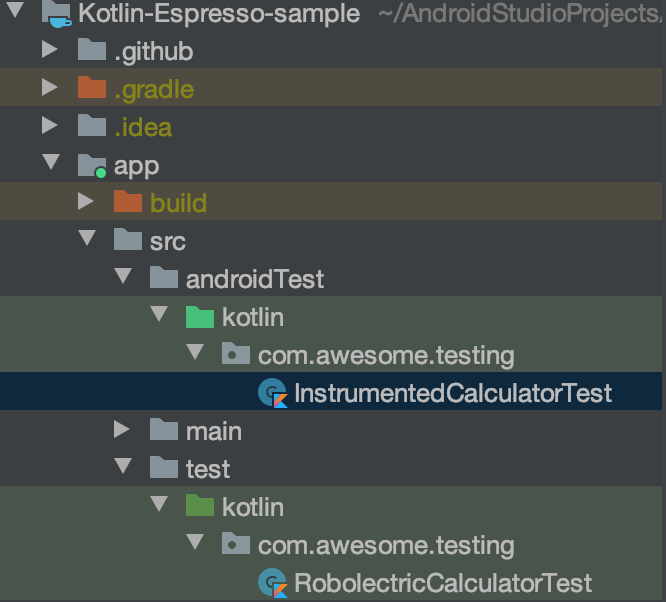
Additionally, you can also have E2E Appium tests in a separate repository (outside your project).
The mapping of those tools on the standard test pyramid isn't straightforward. Roboelectric tests verify integration. Similarly, UIAutomator allows you to run E2E scenarios. Here is how the visualization looks like:
Now I'm going to describe what each tool allows you to test.
Junit (unit tests)
Whenever you plan your tests you should start from the units. They're the fastest, the cheapest, and the most flexible. Android is no exception here. Unfortunately, unit testing Android project is surprisingly complicated. Why? Unit tests are in close relationship with a tested app. Usually, good architecture is testable, meaning writing unit tests is easy. How about Android app architecture? Let's take a look at the popular approach: VIPER.
In VIPER we split our classes into five distinct logic parts:
- The_View_corresponds to an Activity or Fragment in the app.* The_Interactor_performs actions requested by the Presenter.
- The_Presenter_is the app command center. it commands actions, forces View display, and Router navigation.
- The_Entity_represents the app data.
- The_Router_handles navigation.
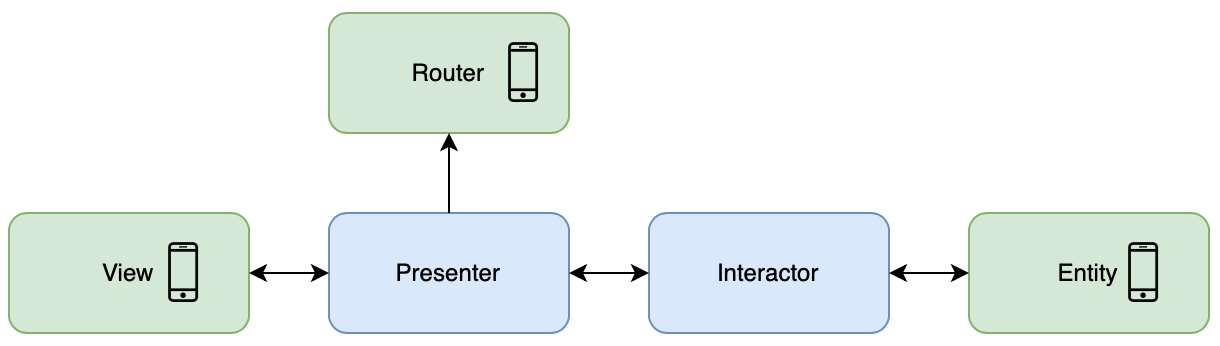
Classes marked by blue color have no dependencies on the Android platform code. With proper implementation, you should be able to test them without excessive use of mocks.
On the other hand, green classes do depend on the core Android code (Activity, Context, SharedPreferences, and more). They are very hard to test on a unit level without relying too much on Mockito (or Kotlin Mockk). Even worse, a lot of Android core methods are static meaning that PowerMock may be required.
This is why Android developers usually like to write clean tests on higher levels, for example using Roboelectric.
Roboelectric (non-instrumented integration tests)
In simple words, Roboelectric is an Android simulator. It allows you to run UI-like tests on JVM only, meaning they're cheap, fast, reliable, and excellent for Continuous Integration (CI) systems. Robolectric handles inflation of views, resource loading, and lots of other stuff that's implemented in native C code on Android devices. This allows tests to do most things you could do on a real device.
Since Robolectric 4.0, Espresso APIs are now supported in Robolectric tests. Even more, you can have shared test implementation for both Roboelectric and Espresso as in the following GitHub example.
Below you can find an example non-instrumented Roboelectric test:
import androidx.test.espresso.Espresso.onView

@RunWith(AndroidJUnit4::class)
class AddContactActivityTest {

    @Test fun inputTextShouldBeRetainedAfterActivityRecreation() {
        // GIVEN
        val contactName = "Test User"
        val scenario = launchActivity<AddContactActivity>()

        // WHEN
        // Enter contact name
        onView(withId(R.id.contact_name_text)).perform(typeText(contactName))
        // Destroy and recreate Activity
        scenario.recreate()

        // THEN
        // Check contact name was preserved.
        onView(withId(R.id.contact_name_text)).check(matches(withText(contactName)))
     }
}
It looks pretty much like Espresso test, isn't it?
Espresso (instrumented integration tests)
Espresso tests are excellent for collaboration between Test Engineers and Android Developers. They are very fun to create because we see our actual app in action on an emulator or physical device. Espresso allows you to test one app only.
You may be wondering why Espresso tests are on the integration level. UI tests shouldn't be here, right? Well, not exactly. To understand why we need to take a look into how Android Activity works.
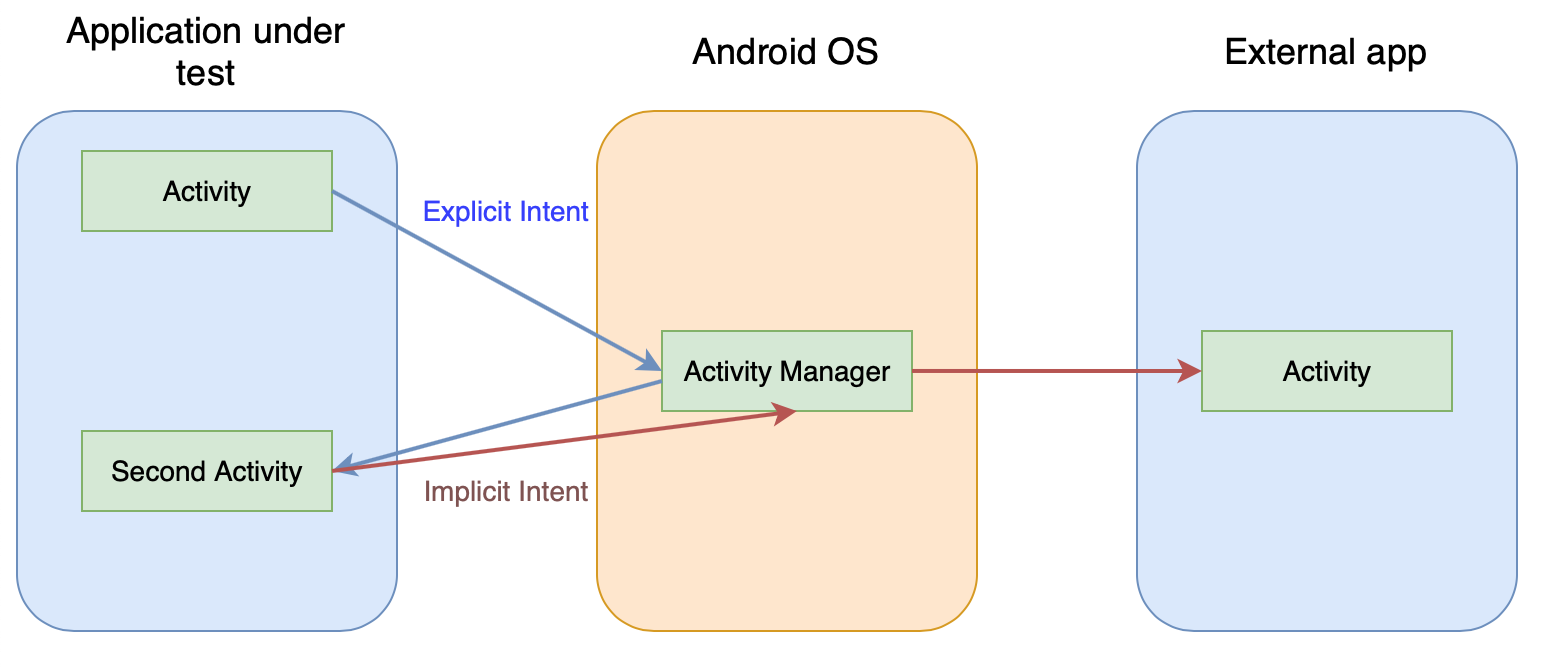
Whenever there is a screen change on Android device Android OS is involved. Each app sends startActivity(Intent) to Activity Manager and it decides what to do next. We have two types on Intents:
- Explicit Intent tells Android OS which Activity on which app should be opened
- Implicit Intent tells OS what we would like to do (for example open navigation) and OS decides which app should be opened
Espresso allows opening any Activity you want so you can start your test on the first, second, middle, or even last screen. Assuming you test the eCommerce app, you can write tests that open the order summary only. Some Activities require Bundle of data. In Espresso you can insert it manually.
What if our app integrates with other apps via Implicit Intents? They can be easily mocked in Mockito-like way.
Below you can find an example of Espresso test which mocks Intents:
@Test fun activityResult_DisplaysContactsPhoneNumber() {
// Build the result to return when the activity is launched.
val resultData = Intent()
val phoneNumber = "123-345-6789"
resultData.putExtra("phone", phoneNumber)
val result = Instrumentation.ActivityResult(Activity.RESULT_OK, resultData)

    // Set up result stubbing when an intent sent to "contacts" is seen.
    intending(toPackage("com.android.contacts")).respondWith(result)

    // User action that results in "contacts" activity being launched.
    // Launching activity expects phoneNumber to be returned and displayed.
    onView(withId(R.id.pickButton)).perform(click())

    // Assert that the data we set up above is shown.
    onView(withId(R.id.phoneNumber)).check(matches(withText(phoneNumber)))
}
What to do when we want to control a device and use multiple apps? Use UI Automator or Appium.
UI Automator (instrumented E2E tests)
UI Automator is perhaps the least popular tool from this article. It doesn't even have its logo - I had to create one using online generators. It is a powerful tool though, and it works quite well. Appium uses it underneath to control Android devices.
The approach for testing using UI Automator is quite different comparing to Espresso. Your write tests that control a device (or emulator), not an app. Of course on a given device you can install your app and verify it works well but Espresso is much faster.
You can find an example of a UI Automator test here.
I'll show you a few use cases for UI Automator (or Appium) in section 8.
Appium (E2E tests)
Appium is a very mature and powerful tool that allows you to automate Windows, Android, and iOS apps. Appium is built on the idea that testing native apps shouldn't require including an SDK or recompiling your app. Appium aims to automate any mobile app from any language and any test framework, with full access to back-end APIs and DBs from test code.
Unfortunately, Appium tests are slow. So what are the use cases for them?
- the team wants to write test in a different language than Java/Kotlin
- the team wants to write mobile tests in Selenium API
- we prefer it ahead of UI Automator in E2E scenarios described in section 8
- we can reuse Web/Native Android/Native iOS/Native Windows automation code (see snippet below)
@FindBy(css = ".myClass")
@WindowsFindBy(id = "windowsId")
@AndroidFindBy(accessibility = "android")
@iOSXCUITFindBy(tagName = "ios")
private FluentWebElement multiPlatformElement;
Here is the proof that the Appium test looks pretty much like Selenium:
private static final String SAMPLE_TITLE = "SampleTitle";
private static final String SAMPLE_BODY = "SampleBody";

    @Page
    private SwiftNoteHomePage noteApp;

    @Test
    public void shouldCorrectlyAddNote() {
        noteApp
                .verifyIfIsLoaded()
                .verifyNoteCount(0)
                .clickAddNote()
                .addNote(SAMPLE_TITLE, SAMPLE_BODY)
                .verifyIfIsLoaded()
                .verifyNoteCount(1)
                .clickAddNote()
                .addNote(SAMPLE_TITLE, SAMPLE_BODY)
                .verifyIfIsLoaded()
                .verifyNoteCount(2);
    }
More Appium examples can be found in FluentLenium project.
E2E Android tests use cases
I can think of at least two test cases which forces you to write slow, hard to maintain and long UI Automator or Appium tests
- testing Proguard/R8 final Release build
According to Google Android docs 'to make your app as small as possible, you should enable_shrinking_in your release build to remove unused code and resources. When enabling shrinking, you also benefit from_obfuscation_, which shortens the names of your app's classes and members, and optimization, which applies more aggressive strategies to further reduce the size of your app'.
Espresso tests can't be run on obfuscated Release build (only Debug) so if you want to perform final checks on your app you have to test it in the E2E scenario. In theory, Progruard shouldn't break anything, but trust me, it does.
- testing internal database upgrade between versions
Android apps can have an internal database stored on the user's device. If we release a new version we have to make sure it migrates properly into a new schema. You need to automate the following steps:
- install old (current) revision on device
- open app
- install new (the one being released) revision on device
- make sure it works and the internal data wasn't corrupted
Android test pyramid - a different approach
As you can see visualizing the Android test pyramid isn't simple. Maybe this image is better? Let me know what do you think in the comments.
Sources
Comments
Loading comments…