
In my earlier article on the Playwright MCP, we looked at the theory behind LLM function calling and the MCP protocol. That gave us the groundwork — but theory alone isn’t enough. The next question is: what does an AI agent actually mean in this context, and why should we care in testing?
At the same time, in my AI Tooling for Developers Landscape post, I surveyed the broader ecosystem of AI tools. Now it’s time to bring those insights into practice — and see how they can perform in test automation.
In this post, we’ll cover:
- AI agents and agentic architecture – what they are and why they’re useful.
- Billing clarity – understanding the difference between fast requests and token-based costs.
- Practical Playwright tips – evaluating how well an agent can generate and write API and UI tests in real workflows.
Traditional LLM Use vs. Agentic Processes
In a traditional setup, using a Large Language Model (LLM) is often a single-shot or fixed-step affair: you provide a prompt and get a response, or at most follow a predetermined sequence of prompts and responses. The LLM behaves passively, giving an answer based solely on the input, and any further action (like another query or a tool invocation) has to be orchestrated by the human or a hard-coded script. In other words, the control flow is pre-defined by the developer – you decide in advance how many calls to the LLM to make and in what order.
By contrast, an agentic approach lets the LLM choose the next step. Instead of a fixed script, the LLM itself can determine the control flow of the application. This means the AI can choose what actions to take (if any) and whether it needs one step or many to reach a goal. For example, a simple question-answer might only need one response, but a complex task (like “find data, analyze it, then answer”) might cause the agent to plan multiple steps or tool uses. The key difference is that standard LLM usage is like a one-and-done response, whereas an agentic process is iterative and autonomous, with the AI making decisions about what to do next.
From a practical standpoint, this shift is significant. In a static LLM integration, if the first answer is wrong or incomplete, the developer has to notice the deficiency and make another request. With an agentic setup, the AI can notice the deficiency and decide to take further action on its own. In essence, agentic architecture gives the LLM a degree of agency – the ability to plan, act, and adjust rather than just respond. This makes the system more resilient for complex tasks, since the AI can keep working until it either finds a solution or determines it cannot.
What is Agentic Architecture?
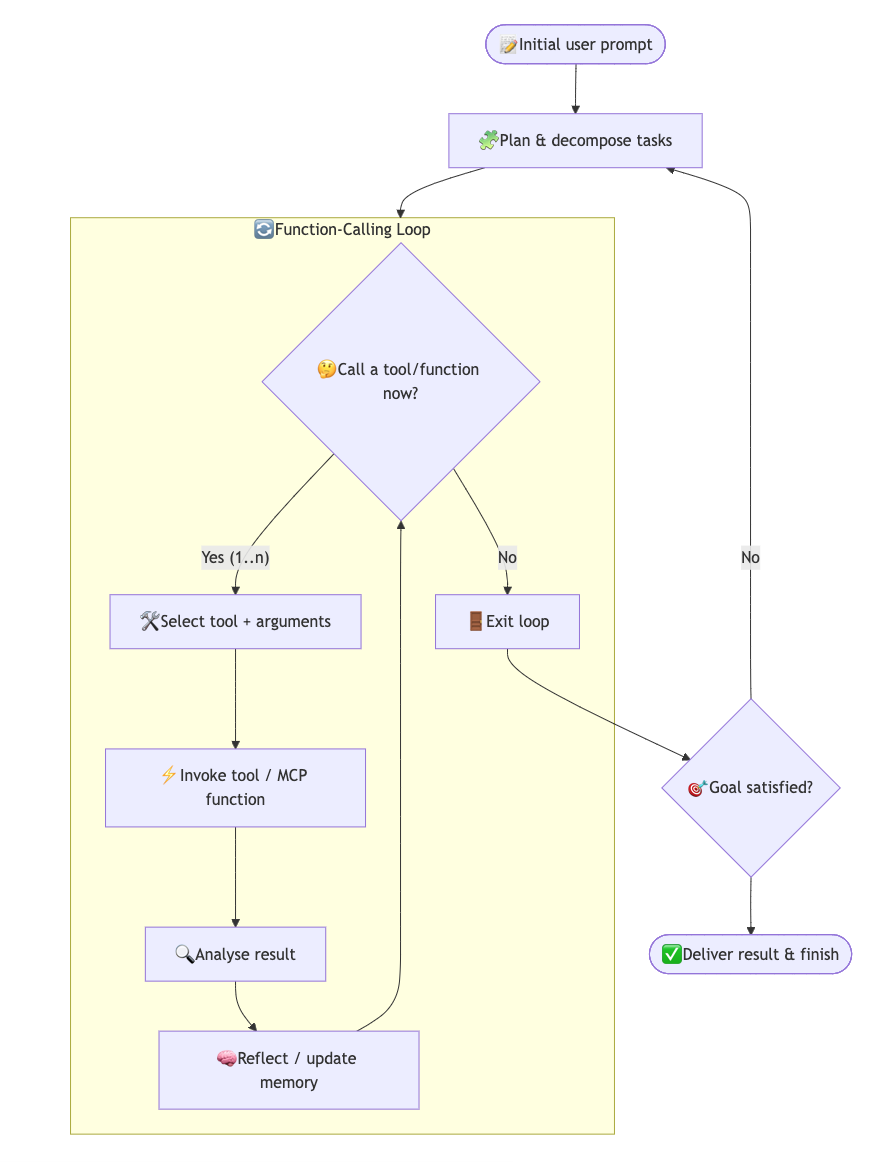
At its core, agentic architecture is a system design where an AI agent is goal-driven and autonomous, operating through a continuous cycle of thinking, acting, and observing. Rather than performing a single-shot task, the agent is given an objective and can iterate through multiple steps to achieve it. The process typically looks like this: the agent thinks (decides what to do next), acts (executes an action such as calling a tool or function), then observes the result and learns from it. These three components – often called the Thought-Action-Observation cycle – repeat in a loop, with the agent refining its approach each time based on feedback from the environment. The loop continues until a defined goal or exit condition is met. Importantly, the agent itself decides when it’s done: the while-loop terminates when the agent decides it has enough information or has achieved the objective. This could be a natural stopping point like “the answer is found,” or in testing scenarios, “all tests now pass.”
What is an AI Agent?
In this sense, an AI agent is best understood as a goal-driven process rather than a single action. It starts with an initial objective (e.g. generating a set of Playwright tests) and then determines how many steps are required to achieve that objective. Sometimes, the agent may reach the goal in a single step. More often, it follows a loop of reasoning, function calls, and tool usage until the task is complete.
Several key features characterize agentic architecture:
Goal-Oriented and Intentional: The agent starts with a clear objective and all its actions are guided by this goal. It has intentionality, meaning it knows what it’s working towards (e.g. “Generate and verify a new UI test” or “Find the correct answer with evidence”). This goal-driven nature keeps the agent focused on a desired outcome.
Be explicit about the goal. Don’t ask ‘generate a test’; ask ‘generate a test that verifies X and fails when X is broken’. This enables self-correction.
Adaptive, Multi-Step Decisions: Unlike a fixed interaction that ends after one or two responses, an agent can take as many steps as needed. It decides at each point whether to finish or to perform another action. This allows for dynamic control flow decided by the AI itself. The agent may call zero, one, or multiple tools/functions in the course of solving a single query. In practice, this means the agent can handle complex workflows by breaking them into smaller tasks and tackling them one by one.
Optimal tool choice is crucial for the success of an agentic process. Sonnet 4 is considered the best model in agentic coding. Note that it doesn't mean it is the greatest at generating code, it also excels at choosing the right tools for the task.
Tool Use and External Actions: Agentic systems typically allow the AI to use tools or APIs to get information or perform actions beyond what the base LLM can do. For example, an agent might call a web search, a calculator, a database, or in the case of Playwright use a dedicated MCP server. This extends the capabilities of the LLM from pure text generation to interacting with external systems or tools.
The popularity of MCP servers haven't come from nowhere. It's a perfect way to equip the agent with tools needed to complete the task.
Memory and Context: As the agent goes through multiple steps, it can retain memory of previous actions and observations. This short-term memory means it doesn’t forget what it already tried or learned. Modern agent frameworks provide mechanisms to store and recall this running context (for example, remembering the result of a function call made in a previous step). This helps the agent build on past insights and avoid repeating mistakes within the same session.
A simple, durable pattern is to track progress in a task-progress.md file. After each step the agent appends status. If the session crashes or the context window resets, you can resume from the last known step.
Self-Correction and Reactivity: A hallmark of agentic AI is self-reactiveness – the ability to adjust its strategy based on feedback. If an action fails or produces an error, the agent doesn’t stop; instead, that failure becomes an observation to learn from. The agent will analyze the result, update its internal plan, and try a different approach. In other words, failures are not the end but a signal to adapt.
This is exactly how a testing agent would behave: if a test case fails, the agent goes back to debugging, edits the code, and tries again until the tests pass (or a maximum number of attempts is reached). This trial-and-error loop makes the system much more robust in practice, as it can catch and fix mistakes autonomously. For instance, in coding tasks, an agent can compile or run tests on the code it wrote and then use any errors as feedback to improve the code.
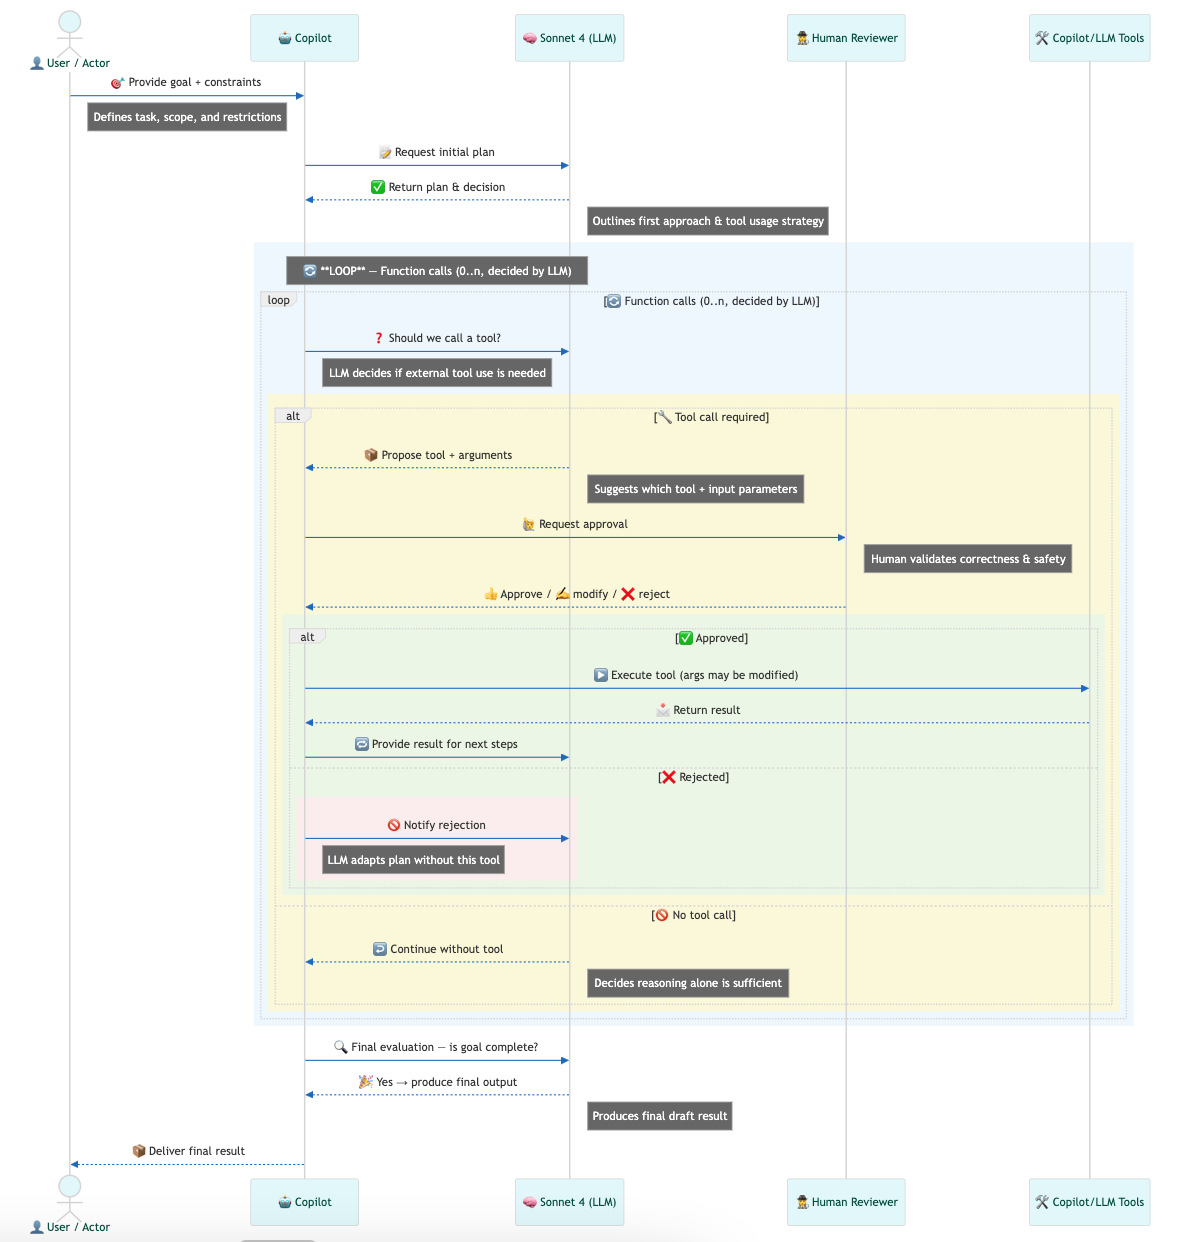
The following sequence diagram illustrates the agentic process inside an AI IDE (e.g. Cursor):
In short: An AI agent is a goal-driven process that dynamically decides how many actions to take—looping through planning, tool use, and self-correction—until it reaches a defined exit condition, such as passing tests.
Billing Clarity: Premium-Request vs. Token-Based Pricing
One practical consideration when using AI coding assistants is how you pay for their AI model usage. Different tools have adopted different pricing models, mainly falling into two categories: request-based (often called “premium requests”) and token-based. Here we’ll explain the difference using GitHub Copilot as an example of request-based pricing and Cursor as an example of token-based pricing.
GitHub Copilot – Request-Based “Premium Request” Pricing
GitHub Copilot’s pricing for AI assistance is built around requests. Essentially, each time you prompt the AI to do something, it counts as a request. For instance, every user prompt in Copilot Chat or Agent mode consumes one request from your allowance. These are sometimes informally called “fast requests” or premium requests, especially when they use advanced models beyond the default one. Copilot’s plans include a monthly allotment of such requests:
- Free Plan: limited to 50 AI chat/agent requests per month (and 2,000 code completion suggestions)
- Pro (Paid) Plans: come with unlimited basic completions and chats using the included base models, plus a quota of premium requests for more powerful models (e.g. ~300 on Pro, ~1500 on Pro+ based on the plan multipliers). Using advanced models (like GPT-5 or Sonnet 4) subtracts from this quota, sometimes even multiple counts per single query due to model multipliers.
If you exhaust your monthly premium request allowance on Copilot, you won’t be completely cut off – you can continue using the included base model (GPT-4.1/GPT-5 mini) without extra charge, albeit potentially with slower or rate-limited responses However, using any higher-end model beyond that point requires enabling paid overages. Copilot effectively charges about $0.04 per extra request once you exceed your plan’s included amount. Many users have a $0 budget by default, meaning Copilot will simply refuse further premium requests unless you opt in to pay more.
In practical terms, each time you hit “Continue” in a Copilot chat to get more output or retry a solution, it triggers a new request – consuming another unit from your allowance. This means iterating on a solution can burn through multiple requests. For instance, users have noted that asking Copilot to refine code repeatedly might spend 10+ requests to finally arrive at a correct answer. Every prompt or follow-up (“premium”) request has a fixed cost in your quota (or wallet if you buy more).
Pros and Cons: The request-based model is straightforward: you pay per attempt, not per length of response. This can be beneficial for very large outputs – whether your AI writes 10 lines or 100 lines of code, it counts the same against your quota. However, it can feel frustrating if you need multiple tries. Even failed or repeated attempts each count as separate requests, which can quickly eat into your limit without stopping you from further usage of the service.
In short, Copilot’s “premium request” pricing favors one-and-done larger tasks. Unfortunately, there are tool calls limits which force you to often click "Continue" to get more output or retry a solution, which triggers a new request – consuming another unit from your allowance.
Cursor – Token-Based Pricing (Usage-Based)
Cursor originally launched with a similar request-based quota system (e.g. Pro users had 500 “fast requests” per month, with additional calls at $0.04 each). However, in mid-2025 they switched to a token-based, usage pricing model for greater clarity and fairness (officially) or to earn more money (unofficially). Instead of counting the number of requests, Cursor Pro now includes a monthly credit (e.g. $20 worth of AI usage) measured in actual token consumption, and charges based on the actual computational cost of each query.
In practice, this works as follows:
- The Pro plan gives a certain dollar amount of “frontier model usage” included each month (for example, $20). This credit is roughly equivalent to the ~225 Sonnet 4 requests, ~550 Gemini requests, or ~500 GPT 5 requests allotment under typical usage, but now it’s calculated in terms of API costs (tokens) rather than a flat count of calls.
Each AI operation you run in Cursor deducts a dollar value from that credit based on how many tokens (characters/words) were processed. Heavier tasks that use more tokens (longer code generations, big context, complex analyses) cost more of your credit; lighter tasks cost very little. Essentially, you pay proportionally to the work the AI does, not just per action. If you stay within the monthly credit, you pay no extra beyond your subscription. If you run out, you can opt to pay for additional usage at cost pricing (the same rate the AI provider charges). Cursor lets you set a spending limit so you won’t be surprised by overages unless you enable them.
Under token-based pricing, the cost of a single request is no longer fixed – it could be only fractions of a cent for a quick answer, or more than the old $0.04 if you ask for a very large output. For example, a simple question can cost about $0.003, whereas a very elaborate code generation might consume far more (even up to a few dollars). Token-based billing attempts to make this usage transparent. However, it's hard to estimate the cost of a single request in advance which raises a lot of controversies around how transparent it really is.
Pros and Cons: The token-based approach is generally more granular and fair over a range of use cases. You’re essentially paying by the volume of AI service used. This means no more arbitrary “500 requests” cap – instead you might have, say, the equivalent of 50,000 tokens of AI output covered by your plan. If you only use small prompts, you won’t waste your allowance on each prompt. Conversely, if you unleash the AI on a very complex task that chews through a huge context window, you will accordingly use more of your included credit (whereas a flat per-request fee might have been a bargain in that scenario). In short, token-based pricing aligns cost with actual computing effort, providing more predictability for the provider and often more flexibility for the user.
Summary
The following table summarizes the key differences between the two pricing models:
| Aspect | Request-based billing | Token-based billing |
|---|---|---|
| Unit of charge | Per premium/fast request | Per tokens (input + output) |
| Cost per action | Fixed (per call) | Variable (depends on context size and response length) |
| Predictability | High for single calls; low if you iterate a lot | Varies by prompt size; predictable for many small prompts |
| Large outputs | Usually cheaper (same price whether 10 or 500 lines) | Costs more as output grows |
| Many small iterations | Expensive (each retry/“Continue” is a new charge) | Cheaper (tiny calls cost pennies) |
| Long context windows | Same price per call | Costs scale up with large context/attachments |
| Effect of retries | Each retry burns another request | Cost rises only with extra tokens used |
| Tool use / multi-step agents | Each tool/planning step may be a new request | Cost reflects total tokens across steps |
| Budgeting & caps | Easy: cap requests/month | Easy: cap monthly spend/credits |
| Cost spikes risk | Bursty if you click “retry” often | Bursty if a single prompt pulls huge context or generates long code |
| Best fit | “One-and-done” generations, long answers, beginners exploring | Frequent short prompts, iterative refinement, advanced users tuning prompts |
| Common pitfalls | Burning quota on small tweaks | Surprise bills from oversized context or verbose outputs |
| How to optimise | Fewer, better prompts; approve plan before running | Trim context; summarise logs; set max output lengths |
In my opinion, the request-based pricing model is more suitable for beginners, whereas the token-based pricing model is more suitable for advanced users who want to control their costs.
If you want to "vibe code" choose request-based pricing.
If you have Gemini/ChatGPT subscription, choose token-based pricing. Use Gemini/ChatGPT to generate a plan, then use Cursor to implement. See my AI Vibe Coding notes from the basement post for more details about the workflow.
Playwright Agentic Coding Tips
Having grasped Playwright MCP, AI tools landscape, and the content of this posts, we are ready to see how well an agent can generate and write API and UI tests for real application.
Setup
In you wish to try my prompts in real world use this local stack:
git clone https://github.com/slawekradzyminski/awesome-localstack
cd awesome-localstack
docker compose -f lightweight-docker-compose.yml up -d
Check that you can make API calls and login on frontend as admin/admin.
For Playwright starter use this repository:
git clone https://github.com/slawekradzyminski/playwright-2025
cd playwright-2025
npm install
npx playwright install chromium
npx playwright test
All tests should pass if you've set up the local stack correctly.
The repository has .cursor/mcp.json set up for MCP server but this works only with Cursor, for other agents check official documentation.
I'm using Cursor IDE with Sonnet 4 model.
1. Start with a plan
When working with AI agents, it is very important to always document everything and keep track of the progress. As a first step, generate comprehensive README.md and agent rules:
Familiarise yourself with the project, read example file,
check @Playwright documentation and generate README.md file.

Generate agent rules file. See @https://docs.cursor.com/en/context/rules
- use npm
- use modern syntax (import/export)
- never generate comments explaining the code
- prefer arrow functions `const name = () => {}` over `function`
- create typescript types in /types folder
- use given (test setup) / when (tested action) / then (assertions)
 in tests provided as comments // given, // when, // then
- order API tests by response code ascending (200 -> 400 -> 401 -> 403 -> 404 -> etc.)
If your agent can't index tool documentation or access HTTP resources use llm.codes or copy paste documentation into the project and and relevant files to context window.
API test plan
Use this prompt to generate API test plan:
Familarise yourself with the project, read example test file and README.

You can access api docs via curl http://localhost:4001/v3/api-docs

Generate API test plan in api-test-coverage.md for all endpoints listed in the file.
- Add tests for all methods (GET, POST, PUT, DELETE) for each endpoint.
- Add tests for all status codes (200, 201, 204, 400, 401, 403, 404).
- Do not add too many test cases for HTTP 400 responses.
 Assume that a lot of validation logic is covered by unit tests.
- Each endpoint should be covered in a separate file.

Make the plan trackable, keep the progress.

Login is already covered by @login.api.spec.ts

Track endpoint coverage.
Save the plan in api-test-coverage.md
Alternatively, you can copy paste api-docs.json into the project.
UI test plan
Generating UI test plan is slightly more complex due to the lack of API docs equivalent. To work around that, consider using gitingest to dump the frontend codebase and prompt:
I'd like to prepare a test plan which should measure UI screen test coverage.
Tell me how many views do we have on the website.
I'm sharing frontend codebase (part of, all react components)
Then you can use Playwright MCP to double-check the completeness of the list:
In @api-test-coverage.md I'm tracking API test coverage.

I'd like to create something similar for UI views coverage.
I believe I've listed all views in @views.md file but make sure the list is complete.
Use Playwright MCP to see all the screens.
You can login as admin/admin and open localhost:8081 where frontend is running.

Check the screens and create ui-test-coverage.md based on api-test-coverage.md.
Login screen is already covered by @login.ui.spec.ts
2. Enforce desired project structure
First AI-generated draft code is often messy and often doesn't follow Playwright best practices (check login.api.spec.ts and login.ui.spec.ts for examples). You need to show/tell AI how you wish to structure the project. Additionally, some higher-level tests may be redundant. AI isn't be default aware of your unit test coverage. Some HTTP 400 validation tests are likely to be redundant. Remove them manually.
API tests
For API tests you can start with:
I'd like to have reusable API layer with standard methods for each endpoint.
Move request execution logic to dedicated http/loginClient.ts file.
Refactor login.api.spec.ts to use new loginClient.ts now.
UI tests
For UI tests you can also delete redundant tests and encourage POM usage:
I'd like to have reusable UI layer with standard methods for each view.
Move page object logic to dedicated ui/loginPage.ts file.
Modify the ui-test-coverage.md to enforce this rule.
Refactor login.ui.spec.ts to use new loginPage.ts now.

Let the pages reflect recommended structure from @https://playwright.dev/docs/pom

Use Playwright MCP to find selectors. Prefer data-testid selectors.
If your agent can't access web or MCP server just copy paste the content of Playwright POM documentation into the project for the execution and then delete it after refactor.
3. Use Few-Shot Prompting to generate tests
Once you've enforced the desired structure, you can start generating tests. Always use Few-Shot Prompting technique to generate new tests. This will likely lead to similar tests. Here is an example:
API tests
Modify the plan in @api-test-coverage.md to include the need of using dedicated clients,
see @login.api.spec.ts @loginClient.ts.

@Faker.js Use Faker to create userGenerator needed for registration tests.
Create userGenerator in generators/userGenerator.ts file.
You need to install it first via npm.

Cover /users/signup by tests now. Run the tests by yourself, make sure they pass.
Update the plan after you have finished.

You can access api docs via curl http://localhost:4001/v3/api-docs
4. Create core functions (like fixtures) with special care
Core functions (like fixtures) are crucial for the success of your test suite. Some views require authenticated user. It's your responsibility to ensure that Auth is handled properly and AI agent knows how to use it.
I'm working on @ui-test-coverage.md. Now I'd like to start covering views
requiring authentication via UI tests.

I'd like to have a fixture which would start my UI tests with logged in user.
I have put steps how to achieve that in @auth_ui_fixture.md.

I believe I can extend existing @auth.fixtures.ts with additional steps (3-5)

Create my fixture and test it on a single new test in home.ui.spec.ts
(which you need to create).Write only the most simple test which verify
that we are logged in at the beginning of the test.
Please note that I'm explicitly cut the scope to the most simple test which verifies that we are logged in at the beginning of the test. I want to focus on actual fixture and review it carefully.
5. Explicitly encourage the usage of existing test utilities
With fixtures, patterns, plan in place every time we generate new tests we can explicitly encourage the usage of existing test utilities. Here is an example:
@api-docs.json I want you to cover product endpoints with API tests,
see @api-test-coverage.md section 3

See existing tests, like @users-get-all.api.spec.ts etc.

Use fixtures from @auth.fixtures.ts.

Use @Faker.js to generate random products, see how @userGenerator.ts is implemented.

Do it endpoint by endpoint. After each new file make sure that new tests are passing.
If not fix them. After each increment update the @api-test-coverage.md with new status.
And what tips do you have for agentic coding?
Comments
Loading comments...