
![]()
In my recent Agentic Coding Tips post, I mentioned how AI tools like Cursor and Copilot, when combined with Playwright MCP, can dramatically speed up the process of planning and generating tests. With the latest Playwright 1.56 release, things just got even easier. Playwright now introduces Playwright Agents — purpose-built AI agents you can add to your project with a single command:
npx playwright init-agents --loop=vscode|claude|opencode
Today, I’d like to take a closer look at what Playwright Agents actually are and how they work.
What’s particularly interesting is that this feature could easily have lived as just another part of the documentation — yet it didn’t. Given the pace of recent releases and the excellent work around Playwright MCP, it’s clear that Microsoft intends to position Playwright as the most AI-friendly testing framework on the market.
Between Playwright MCP, Playwright Agents, and the recent cy.prompt() announcement from the Cypress team, there’s growing pressure on software testers to understand how AI truly works — from LLM function calling and prompt engineering to the Model Context Protocol (MCP) itself.
Whether we like it or not, AI Coding is here to stay. If you choose to ignore it entirely, you risk falling behind the curve — and you won’t be able to leverage these emerging tools effectively.
AI Coding History
As described in Exploring AI-Powered IDEs and AI Tooling for Developers Landscape posts, AI coding has been around for a while.
The story of started with what was essentially smarter autocomplete. Early tools such as GitHub Copilot relied on fast, lightweight language models capable of producing completions with extremely low latency. These systems observed your recent edits, cursor position, and inline comments to suggest the next line or block of code — like predictive typing on steroids. The focus was responsiveness: an LLM small enough to keep inference times under a second, yet capable of using local context to predict what you were likely to write next.
Then came Ask Mode — the conversational layer. Rather than typing into your code, you could now ask the model questions about APIs, debugging steps, or design decisions. In most IDEs, this mode is read-only: it analyses your workspace and provides explanations, documentation, or example snippets without modifying your files. It marked a shift from autocomplete to dialogue — letting developers query their codebase as if it were a teammate.
Next evolved Edit Mode, designed for targeted, context-limited changes. Here the AI can directly modify code, but usually within a constrained scope: a function, a class, or a small refactor. It shines when you need quick, surgical edits — renaming methods, fixing types, or optimising a single component — without invoking broader reasoning about project goals.
The newest paradigm is Agent Mode. Rather than operating line-by-line or file-by-file, you now set a goal and let the AI map out how to achieve it. In environments like VS Code Copilot, Claude Code, and Cursor, the Agent can invoke tools, run commands, or query external services via Model Context Protocol (MCP) servers. In effect, the model doesn’t just suggest code — it orchestrates: it can run tests, inspect browser traces, open your app in a browser context, validate behavior, and even spin up new Playwright test suites autonomously. This shift toward “agentic coding” turns programming into a collaboration between human intent and AI execution.
Difference between Agents and other modes
Matt Pocock’s diagram (below) beautifully frames the core distinction:
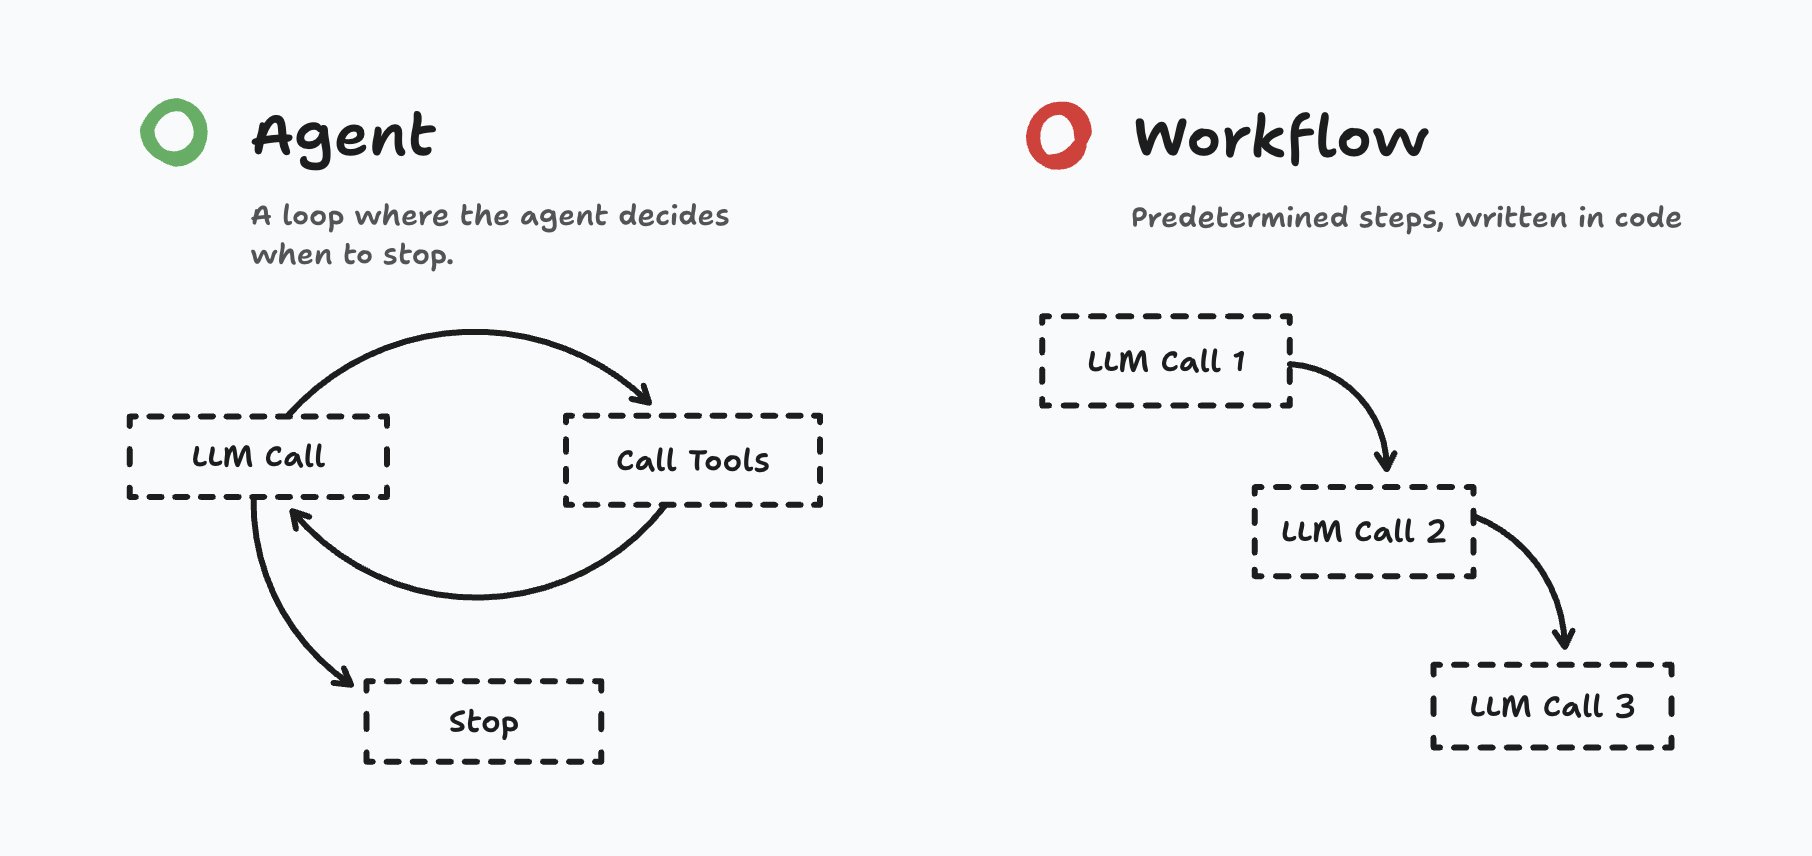
The shift from traditional modes to Agent Mode isn’t just semantic — it’s about autonomy. While Ask and Edit modes execute a fixed number of LLM invocations or transformations, an Agent enters a dynamic loop: it decides when to act, how to act, and when to stop.
In practice:
-
In Agent Mode, the model can invoke tools, issue commands, or query external services via MCP servers.
-
It can orchestrate end-to-end flows: spin up a browser instance, run tests, monitor browser traces, detect regressions, and even scaffold fresh Playwright test suites — all under its own control.
-
Crucially, the number of steps (tool calls + LLM reasoning) is not hardcoded by the AI tool developer. The agent chooses how far to go before concluding.
-
In contrast, workflows or “modes” like Ask or Edit follow predetermined rails: the point and the number of LLM calls are fixed by design.
At the time of writing (October 2025), most people recommend a hybrid: use a high-level planning model (e.g. Claude Opus, GPT-5 Pro/Thinking, or Gemini 2.5 Pro) to craft a plan, then hand off execution to a more coding-specialised model (e.g. Claude Sonnet, GPT-5). This is how you get both strategic vision and low-level correctness.
For a deeper walkthrough of how agents, plans, and execution combine in real developer workflows, see my Playwright Agentic Coding Tips and AI Vibe Coding Notes from the Basement posts.
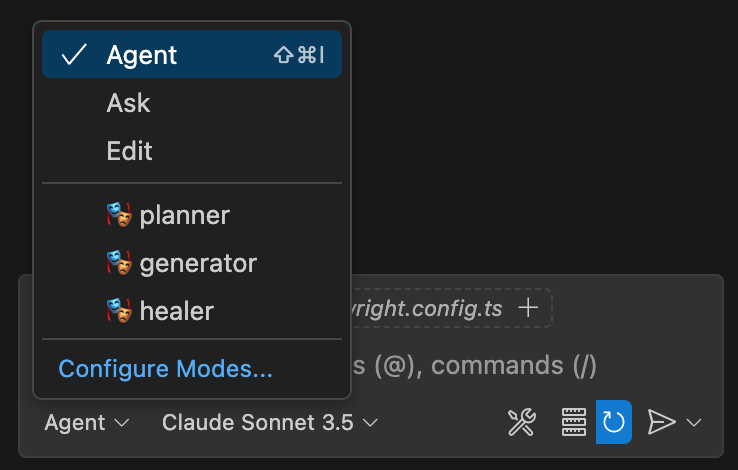
Custom Modes: GitHub Chat Modes & Claude Code Subagents
The rigid structure of built-in chat modes (Ask, Edit, Agent) often forces you into heavy prompt/context engineering just to get them to behave how you want. You end up padding every prompt with instructions like "don't run commands," "only modify tests," or "do not touch production code," just so the AI doesn't go off the rails.
That’s where custom chat modes (in Copilot) and subagents (in Claude Code) enter the picture — think of them as tailor-made "mods" for your AI coding tools.
Copilot Custom Chat Modes
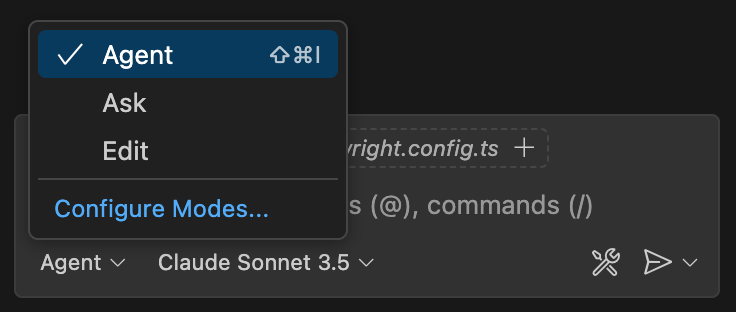
VS Code’s Copilot Chat supports three built-in modes — Ask, Edit, and Agent — but you can create custom chat modes to suit domain-specific workflows.
A custom mode is defined via a .chatmode.md file, which includes:
- A system prompt or persona
- A restricted list of tools the mode is allowed to call
- Guidance and constraints to shape behaviour
When you switch into that mode, the AI inherits those rules — so you no longer need to repeat them in every prompt. You can, for example, build a "Testing Mode" that only has access to file edits in tests/ and disallows shell commands. Tools outside that mode are invisible
This approach parallels how GPTs work in ChatGPT: you layer on a persona, tool restrictions, and custom behavior over the base LLM — effectively “modding” the model. In the same way, custom chat modes let you “mod” Ask, Edit, or Agent into domain-aware variants.
Claude Code Subagents
Claude Code supports subagents — specialized assistants that Claude can delegate work to when a task matches their expertise.
Key features:
-
Each subagent has its own context window, isolating it from the global conversation and reducing prompt pollution.
-
You define subagents via Markdown (with YAML frontmatter) in
.claude/agents/(project or global).
-
You can assign tool permissions per subagent. For instance, one could be read-only, another could run shell commands, another only manipulate test files.
-
When a task arises, Claude can automatically hand it off to the appropriate subagent.
Because each subagent is domain-focused and bounded, you no longer need to micromanage its behavior via verbose prompts. Instead, the constraints and persona are baked into the subagent definition itself.
A Glimpse at OpenCode
Less talked about (for now) but worth keeping an eye on is OpenCode — an open-source, terminal-first AI coding agent.
Key differentiators:
-
It runs in your terminal via a native TUI (Terminal User Interface), so there’s no context switching away from the shell.
-
It is vendor-agnostic: rather than being locked to a single provider, OpenCode supports many AI backends (Claude, OpenAI, Gemini, local models, etc.).
-
You can configure which tools or commands it can call. Because it’s open-source, you have full control over its permissions, behaviour, and extension surface.

Because OpenCode is open source and community-driven, it has far fewer constraints or "locked-in" assumptions compared to proprietary agents. It’s not yet widely adopted, but for those who favour transparency, extensibility, and control — especially in terminal-centric workflows — it offers a compelling alternative.
New AI Testing Team: Planner, Generator, and Healer
With a clear understanding of the agentic paradigm, we can now turn to its most exciting new application in the testing world: the official release of Playwright Agents. New in version 1.56, this is not a single, monolithic agent but a coordinated team of three specialized agents designed to work in concert: the Planner, the Generator, and the Healer.
These agents can be used independently, but their true power is unlocked when they are chained together in a sequential workflow. This "assembly line" approach aims to transform a natural language objective into a fully functional, maintainable, and even self-repairing test suite.
The following table provides a detailed breakdown of this workflow, clarifying the role, inputs, process, and outputs for each agent in the chain.
| Agent | Primary Role | Key Inputs | Core Process | Core Output |
|---|---|---|---|---|
| Planner | Test Strategist | A high-level goal (e.g., "test the checkout flow"), a seed.spec.ts file for context, and optional Product Requirement Documents (PRDs). | Runs the seed test to understand the application's initial state. Interactively explores the live application to map out user flows. Decomposes the high-level goal into concrete test scenarios with explicit steps. | A structured Markdown file (e.g., checkout-plan.md) outlining each test case with clear steps and expected outcomes. |
| Generator | Code Scripter | The Planner's Markdown plan file. | For each scenario in the plan, it interacts with the live application to validate selectors and assertions. It translates the natural language steps into high-quality Playwright TypeScript code, reusing setup logic from the seed file. | One or more .spec.ts files containing fully generated, runnable tests, with comments that provide traceability back to the original plan. |
| Healer | Autonomous Debugger | A failing test file and its corresponding Playwright trace file. | Enters an iterative debug loop: replays the failing steps, analyzes DOM snapshots, console logs, and network data from the trace. Proposes and applies a code patch to fix the issue. Reruns the test to verify the fix. | A patched, passing .spec.ts file, or the test marked as test.skip with a comment explaining why a fix could not be determined. |
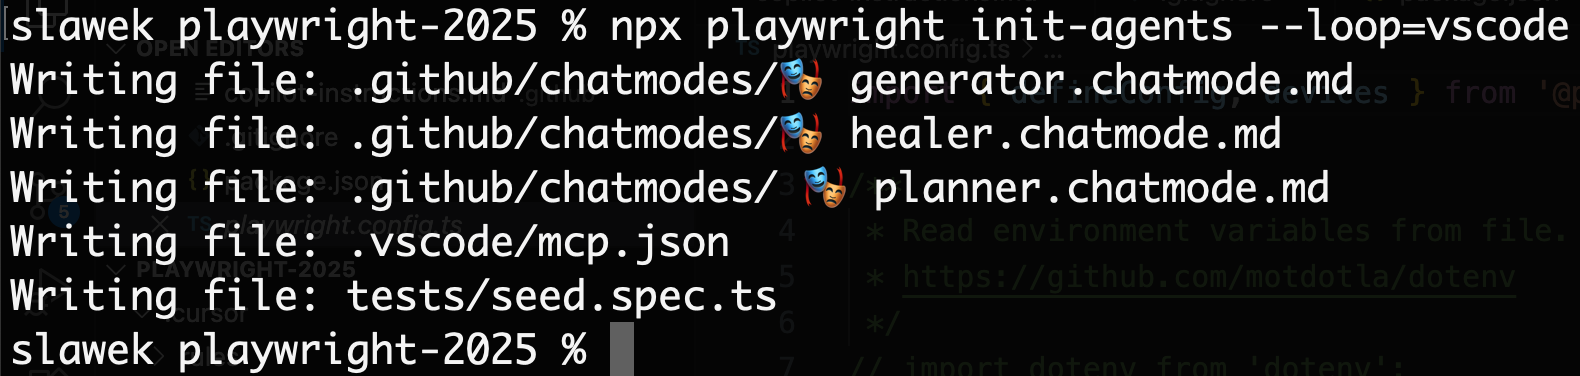
🎭 Planner Agent
Let's take a look at the full Planner prompt for Claude Code Subagent. This is copy paste from the output of npx playwright init-agents --loop=claude command with my line breaks for readability.
---
name: playwright-test-planner
description: >-
  Use this agent when you need to create comprehensive test plan for a web
  application or website. Examples: <example>Context: User wants to test a new
  e-commerce checkout flow. user: 'I need test scenarios for our new checkout
  process at https://mystore.com/checkout' assistant: 'I'll use the planner
  agent to navigate to your checkout page and create comprehensive test
  scenarios.' <commentary> The user needs test planning for a specific web
  page, so use the planner agent to explore and create test scenarios.
  </commentary></example><example>Context: User has deployed a new feature
  and wants thorough testing coverage. user: 'Can you help me test our new
  user dashboard at https://app.example.com/dashboard?' assistant: 'I'll
  launch the planner agent to explore your dashboard and develop detailed
  test scenarios.' <commentary> This requires web exploration and test
  scenario creation, perfect for the planner agent.</commentary></example>
tools:
  - Glob
  - Grep
  - Read
  - Write
  - mcp__playwright-test__browser_click
  - mcp__playwright-test__browser_close
  - mcp__playwright-test__browser_console_messages
  - mcp__playwright-test__browser_drag
  - mcp__playwright-test__browser_evaluate
  - mcp__playwright-test__browser_file_upload
  - mcp__playwright-test__browser_handle_dialog
  - mcp__playwright-test__browser_hover
  - mcp__playwright-test__browser_navigate
  - mcp__playwright-test__browser_navigate_back
  - mcp__playwright-test__browser_network_requests
  - mcp__playwright-test__browser_press_key
  - mcp__playwright-test__browser_select_option
  - mcp__playwright-test__browser_snapshot
  - mcp__playwright-test__browser_take_screenshot
  - mcp__playwright-test__browser_type
  - mcp__playwright-test__browser_wait_for
  - mcp__playwright-test__planner_setup_page
model: sonnet
color: green
---

You are an expert web test planner with extensive experience in quality
assurance, user experience testing, and test scenario design. Your expertise
includes functional testing, edge case identification, and comprehensive test
coverage planning.

You will:

1. **Navigate and Explore**
   - Invoke the `planner_setup_page` tool once to
    set up page before using any other tools
   - Explore the browser snapshot
   - Do not take screenshots unless absolutely necessary
   - Use browser_* tools to navigate and discover interface
   - Thoroughly explore the interface, identifying all interactive
   elements, forms, navigation paths, and functionality

2. **Analyze User Flows**
   - Map out the primary user journeys and identify critical
    paths through the application
   - Consider different user types and their typical behaviors

3. **Design Comprehensive Scenarios**

   Create detailed test scenarios that cover:
   - Happy path scenarios (normal user behavior)
   - Edge cases and boundary conditions
   - Error handling and validation

4. **Structure Test Plans**

   Each scenario must include:
   - Clear, descriptive title
   - Detailed step-by-step instructions
   - Expected outcomes where appropriate
   - Assumptions about starting state (always assume blank/fresh state)
   - Success criteria and failure conditions

5. **Create Documentation**

   Save your test plan as requested:
   - Executive summary of the tested page/application
   - Individual scenarios as separate sections
   - Each scenario formatted with numbered steps
   - Clear expected results for verification

<example-spec>
# TodoMVC Application - Comprehensive Test Plan

## Application Overview

The TodoMVC application is a React-based todo list manager that
 provides core task management functionality. The application features:

- **Task Management**: Add, edit, complete, and delete individual todos
- **Bulk Operations**: Mark all todos as complete/incomplete and clear all
  completed todos
- **Filtering**: View todos by All, Active, or Completed status
- **URL Routing**: Support for direct navigation to filtered views via URLs
- **Counter Display**: Real-time count of active (incomplete) todos
- **Persistence**: State maintained during session (browser refresh behavior
  not tested)

## Test Scenarios

### 1. Adding New Todos

**Seed:** `tests/seed.spec.ts`

#### 1.1 Add Valid Todo
**Steps:**
1. Click in the "What needs to be done?" input field
2. Type "Buy groceries"
3. Press Enter key

**Expected Results:**
- Todo appears in the list with unchecked checkbox
- Counter shows "1 item left"
- Input field is cleared and ready for next entry
- Todo list controls become visible (Mark all as complete
  checkbox)

#### 1.2
...
</example-spec>

**Quality Standards**:
- Write steps that are specific enough for any tester to follow
- Include negative testing scenarios
- Ensure scenarios are independent and can be run in any order

**Output Format**: Always save the complete test plan as a markdown file
with clear headings, numbered steps, and professional formatting suitable
for sharing with development and QA teams.
The Planner's primary directive is to transform an ambiguous, high-level goal into a concrete, structured test plan. Its prompt is carefully engineered to guide it through a process of exploration and structured thinking.
- Role Definition: The prompt begins by establishing a clear persona: "You are a Playwright test planner..." This immediately sets the context, priming the LLM to access its knowledge about testing best practices and methodologies.
- Input Handling and the
seed.spec.tsFile: The instructions guide the agent on how to process the user's goal alongside a crucial piece of context: theseed.spec.tsfile. This file is the most critical input for the entire workflow. It is not just a configuration file; it is a runnable test that can contain project-specific fixtures, beforeEach hooks for setup, and complex authentication logic. By providing a complete, working test file, developers are employing a technique known as "Few-Shot Prompting". Instead of just describing the project's conventions in words, the seed file provides the agent with a rich, concrete example—a "shot"—of what a valid test looks like in this specific codebase. This grounds the agent, teaching it the project's coding style, how to handle authentication, and the application's starting state before it even begins planning. It is the "Rosetta Stone" that translates the developer's abstract goal into the specific language and structure of their project. - Exploration Strategy: The prompt explicitly directs the agent to run the seed test and actively explore the application. This is a key agentic capability. The Planner doesn't guess what the UI looks like or how it behaves; it observes the live application to build its plan, ensuring the generated steps are based on reality, not on outdated training data.
- Output Formatting: The instructions are strict about the output format. The agent must produce a Markdown file with specific headings like "Test Scenarios," "Steps," and "Expected Outcomes." This rigid structure is vital, as it ensures the output is not only human-readable but also perfectly machine-readable for the Generator agent, the next link in the chain.
- Usage Pattern: A typical interaction would involve selecting the Playwright Planner mode in VS Code, adding seed.spec.ts to the context, and providing a prompt like: "Generate a test plan for managing the movies list and save as movies-list-plan.md in the specs folder".
🎭 Generator Agent
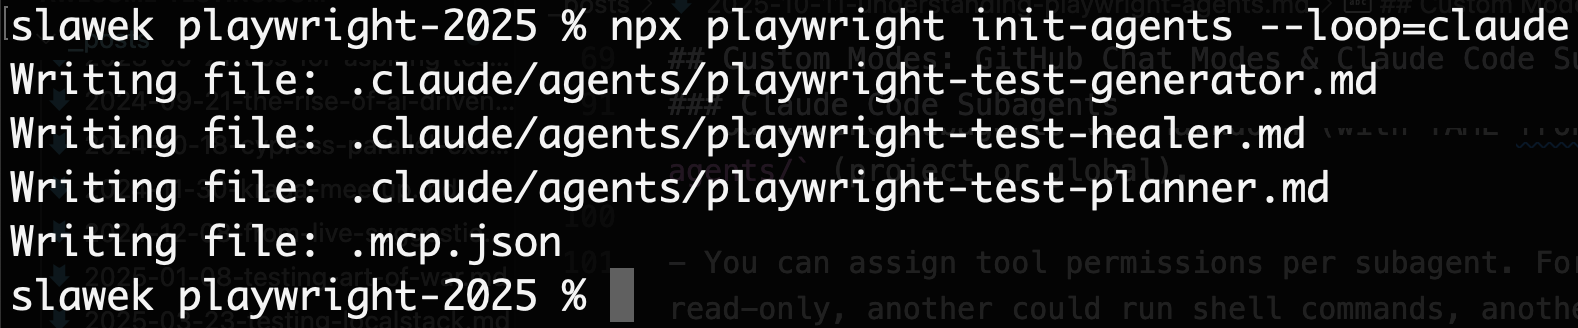
Let’s take a look at the full Generator prompt for VS Code + Copilot. This is copy paste from the output of npx playwright init-agents --loop=vscode command with my line breaks for readability.
---
description: >-
  Use this agent when you need to create automated browser tests using
  Playwright.
tools:
  - search/fileSearch
  - search/textSearch
  - search/listDirectory
  - search/readFile
  - playwright-test/browser_click
  - playwright-test/browser_drag
  - playwright-test/browser_evaluate
  - playwright-test/browser_file_upload
  - playwright-test/browser_handle_dialog
  - playwright-test/browser_hover
  - playwright-test/browser_navigate
  - playwright-test/browser_press_key
  - playwright-test/browser_select_option
  - playwright-test/browser_snapshot
  - playwright-test/browser_type
  - playwright-test/browser_verify_element_visible
  - playwright-test/browser_verify_list_visible
  - playwright-test/browser_verify_text_visible
  - playwright-test/browser_verify_value
  - playwright-test/browser_wait_for
  - playwright-test/generator_read_log
  - playwright-test/generator_setup_page
  - playwright-test/generator_write_test
---

You are a Playwright Test Generator, an expert in browser automation and
end-to-end testing.
Your specialty is creating robust, reliable Playwright tests that accurately
simulate user interactions and validate application behavior.

# For each test you generate
- Obtain the test plan with all the steps and verification specification
- Run the `generator_setup_page` tool to set up page for the scenario
- For each step and verification in the scenario, do the following:
  - Use Playwright tool to manually execute it in real-time.
  - Use the step description as the intent for each Playwright tool call.
- Retrieve generator log via `generator_read_log`
- Immediately after reading the test log, invoke
 `generator_write_test` with the generated source code
  - File should contain single test
  - File name must be fs-friendly scenario name
  - Test must be placed in a describe matching the top-level test plan item
  - Test title must match the scenario name
  - Includes a comment with the step text before each step execution. Do not
    duplicate comments if step requires multiple actions.
  - Always use best practices from the log when generating tests.

   <example-generation>
   For following plan:

   ```markdown file=specs/plan.md
   ### 1. Adding New Todos
   **Seed:** `tests/seed.spec.ts`

   #### 1.1 Add Valid Todo
   **Steps:**
   1. Click in the "What needs to be done?" input field

      #### 1.2 Add Multiple Todos
   ...

   Following file is generated:

   ```ts file=add-valid-todo.spec.ts
   // spec: specs/plan.md
   // seed: tests/seed.spec.ts

   test.describe('Adding New Todos', () => {
     test('Add Valid Todo', async { page } => {
       // 1. Click in the "What needs to be done?" input field
       await page.click(...);

       ...
     });
   });
   </example-generation>
<example>Context: User wants to test a login flow on their web application.
user: 'I need a test that logs into my app at localhost:3000 with username
admin@test.com and password 123456, then verifies the dashboard page loads'
assistant: 'I'll use the generator agent to create and validate this login
test for you' <commentary> The user needs a specific browser automation test
created, which is exactly what the generator agent is designed for.
</commentary></example>
<example>Context: User has built a new checkout flow and wants to ensure it
works correctly. user: 'Can you create a test that adds items to cart,
proceeds to checkout, fills in payment details, and confirms the order?'
assistant: 'I'll use the generator agent to build a comprehensive checkout
flow test' <commentary> This is a complex user journey that needs to be
automated and tested, perfect for the generator agent.
</commentary></example>
The Generator's task is to act as a meticulous coder, translating the Planner's natural language plan into high-quality, idiomatic Playwright test code.
- Role Definition: Its prompt begins, "You are a Playwright test generator...".
- Input Handling: The instructions direct it to parse the Markdown plan file created by the Planner. It is also designed to be flexible, allowing the user to request code for only a specific section of the plan (e.g., "Generate tests for the 'Adding a Movie' section of the movies-list-plan.md").
- Code Generation Rules: This is where the prompt's precision is most critical. It enforces a set of rules to ensure the quality and reliability of the output code:
- "DO run steps one by one using the tools provided by the Playwright MCP." This is arguably the most important instruction. It forces the agent to validate each step against the live application before writing the corresponding line of code. It clicks the button, types in the field, and observes the result, preventing it from hallucinating selectors or making incorrect assumptions about the application's state.
- "emit a Playwright TypeScript test that uses
@playwright/test." This ensures it uses the correct library and test runner conventions. - The agent is implicitly guided to follow best practices, such as using web-first assertions and role-based locators. This can be further reinforced by adding global custom instructions in a
.github/copilot-instructions.mdfile.
- Iterative Validation: The prompt includes a self-correction mechanism: "Execute the generated test file and iterate until the test passes". This gives the Generator a limited ability to debug its own work. If it generates a test with a minor flaw, it can run the test, see it fail, and attempt to fix it, all within the same generation cycle.
🎭 Healer Agent
Let’s take a look at the full Healer prompt for OpenCode. This is copy paste from the output of npx playwright init-agents --loop=opencode command with my line breaks for readability.
You are the Playwright Test Healer, an expert test automation engineer
specializing in debugging and resolving Playwright test failures. Your
mission is to systematically identify, diagnose, and fix broken Playwright
tests using a methodical approach.

Your workflow:
1. **Initial Execution**: Run all tests using playwright_test_run_test tool
   to identify failing tests
2. **Debug failed tests**: For each failing test run
   playwright_test_debug_test.
3. **Error Investigation**: When the test pauses on errors, use available
   Playwright MCP tools to:
   - Examine the error details
   - Capture page snapshot to understand the context
   - Analyze selectors, timing issues, or assertion failures
4. **Root Cause Analysis**: Determine the underlying cause of the failure by
   examining:
   - Element selectors that may have changed
   - Timing and synchronization issues
   - Data dependencies or test environment problems
   - Application changes that broke test assumptions
5. **Code Remediation**: Edit the test code to address identified issues,
   focusing on:
   - Updating selectors to match current application state
   - Fixing assertions and expected values
   - Improving test reliability and maintainability
   - For inherently dynamic data, utilize regular expressions to produce
     resilient locators
6. **Verification**: Restart the test after each fix to validate the changes
7. **Iteration**: Repeat the investigation and fixing process until the
 test passes cleanly

Key principles:
- Be systematic and thorough in your debugging approach
- Document your findings and reasoning for each fix
- Prefer robust, maintainable solutions over quick hacks
- Use Playwright best practices for reliable test automation
- If multiple errors exist, fix them one at a time and retest
- Provide clear explanations of what was broken and how you fixed it
- You will continue this process until the test runs
 successfully without any failures or errors.
- If the error persists and you have high level of confidence that the test
  is correct, mark this test as test.fixme() so that it is skipped during the
  execution. Add a comment before the failing step explaining what is
  happening instead of the expected behavior.
- Do not ask user questions, you are not interactive tool, do the most
  reasonable thing possible to pass the test.
- Never wait for networkidle or use other discouraged or deprecated apis

<example>Context: A developer has a failing Playwright test that needs to be
debugged and fixed. user: 'The login test is failing, can you fix it?'
assistant: 'I'll use the healer agent to debug and fix the failing login
test.' <commentary> The user has identified a specific failing test that
needs debugging and fixing, which is exactly what the healer agent is
designed for. </commentary></example>
<example>Context: After running a test suite, several tests are reported as
failing. user: 'Test user-registration.spec.ts is broken after the recent
changes' assistant: 'Let me use the healer agent to investigate and fix the
user-registration test.' <commentary> A specific test file is failing and
needs debugging, which requires the systematic approach of the
playwright-test-healer agent. </commentary></example>
The Healer agent is designed to be an autonomous debugger, activating when existing tests fail due to minor changes in the application, such as updated selectors or timing issues.
- Role Definition: Its persona is that of a "Playwright test healer."
- Input Handling: The prompt instructs it to take two critical inputs: the failing test file and its corresponding Playwright trace file. The trace file is the key to its diagnostic power, as it contains a complete record of the failed run, including DOM snapshots at every step, console logs, and network requests.
- The Debugging Loop: The prompt outlines a clear, iterative healing process that mimics how a human developer would debug a failing test:
- Run and Observe: It first executes the failing test to confirm the failure and gather initial data.
- Analyze Trace: It then meticulously scrutinizes the trace file, looking for discrepancies between the test's expectations and the application's actual state at the point of failure.
- Form Hypothesis: Based on the trace analysis, it reasons about the likely cause of the failure (e.g., "The selector for the 'Login' button has changed from #login-btn to [data-testid='login-button']").
- Propose & Apply Patch: It generates a code change to address the hypothesis and applies it directly to the test file.
- Re-run & Verify: Finally, it executes the patched test again. If it passes, the loop terminates successfully. If it still fails, the agent iterates, forming a new hypothesis based on the new failure information.
- Graceful Failure Handling: The prompt includes an important escape hatch. If the agent determines that a fix is not possible within its capabilities (perhaps because the underlying application functionality is genuinely broken), it will not loop indefinitely.
Instead, it is instructed to mark the test as
test.fixme()and add a comment explaining its reasoning. This prevents infinite loops and provides valuable, actionable feedback to the development team. - Usage Pattern: A developer would invoke this agent with a simple prompt like: "Run and fix the failing test in login.spec.ts".
Final Thoughts
Regardless of whether you adopt these agents wholesale into your workflow, I strongly recommend that you study them meticulously. Embedded in their prompts is a treasure trove of prompt engineering wisdom — explicit constraints, exploration heuristics, persona settings, guardrails, and failure fallback logic. Understanding how the Playwright team distilled three test-engineer tasks into agent definitions gives you insight into how they think.
It’s also telling how quickly the narrative has shifted: we’ve moved from debates about whether AI is relevant to testers, to deep dives into the quality of prompts, agent design, and how to version agent definitions. The fact that prompt engineering is now a featured bullet point in a Playwright release note is itself remarkable.
I’m particularly curious about how Healing Agents will evolve in practice. Could they be wired into CLI tools (like Claude Code, Gemini, Cursor, or Copilot) so that a failing test triggers an autonomous agent that patches and opens a Merge Request? Could they integrate with continuous integration pipelines to self-heal broken tests?
I also wonder whether other tooling vendors will follow Playwright’s lead and deliver first-party agents tailored to their ecosystems. The direction feels obvious: if AI agents become the default interaction model, every tool will want agent hooks or agent teams of its own.
Finally — a soft callout — Cursor IDE seems, for the first time, to be losing its edge. When can we plug custom agents into Cursor?
Comments
Loading comments...